Pages

Tuesday, February 22, 2011

Get Your Paint On- Week 4


Here is my latest piece from the online class I'm taking.  We were supposed to concentrate on composition with this piece.

I usually feel like balance and composition come pretty naturally to me, but on this piece, I specifically paid attention to it- making sure the weight and colors worked well.  

It was another fun one to do! Although I'm having a little too much fun doing these pieces for the class, and not working on my kids' journals, unfortunately!!  I'll be playing catch-up in those once this is all done with!

Thursday, February 17, 2011

Get Your Paint On- Week Three

This week, our assignment was to pick four (I cheated, and only picked three) objects from our life, and match their colors in our painting. 

I chose my three kids' "lovies":  Riley's puppy, Noah's giraffe, and Avery's blankie.  The chairs in the painting are the paints I mixed.  In reality, they match a little better than the photo shows, but they also dried a bit darker than the mixed paints. 

 One light bulb moment for me this week was Mati and Lisa's recommendation to never use paint straight from the bottle.  They recommend always mixing your paints to get more complex colors.  While I can't say that I followed that 100% this week, it did really affect the way I used my colors, and I did a lot more mixing than I usually do.  They did an interview with Matte Stephens this week, which further cemented those ideas.  His pallette is SO AMAZING- I look at his work, and think my colors look so amateur-ish comparatively!

Anyway, this piece took a while to come together.  I'm really wondering about my use of the arches.  I can't tell if I use the shape as a fall-back or not.  But they just feel so "right" to me, that it's hard NOT to use them.  And I sort of feel like I haven't completely explored them to their fullest yet. 

What I'm enjoying is using some of the more geometric shapes in combination with the organic shapes of the arches.  This is new for me, so I'll play with that for a while...

Okay, that's all. Avery's banging on the porch door with a golf club, so guess I'd better go attend to my kids!!

Thursday, February 10, 2011

Get Your Paint On- Week Two

Here is my piece of work for the second week of Mati and Lisa's class.  We were asked to use a favorite painting or artist as a starting point, and go from there.  I am a great admirer of Jennifer Mercede's work, and especially this tryptich.  I love how she paints lots of details, then covers over large portions of her painting, leaving only glimpses of the underpainting. 

Jennifer doesn't tend to use many collage elements or photos in her work, but I wanted to try to merge her style with my own, so I decided to put photos of my kids in, so I felt an emotional connection to it.


This piece was so much fun to do!  I didn't really think about what I was doing for the majority of the time I worked (don't you just love it when you can get into that sort of zone while you work?), and I just let the shapes emerge.  The movement and forms of the painting just felt very "right" and comfortable to me, and I kept getting a sense of some sort of protective creature carrying the kids within it as it lurched along.  The whole thing also sort of has an outer space feeling to it, and I have no idea where that's coming from, but I guess I just need to go with it...!


I always do well with "assignments" when I work- it gives me a starting point, and a different way of thinking, which can really help if I'm feeling in a rut.  So I'm loving that aspect of this class.  Additionally, I've learned about so many new artists already, which is always great inspiration!  Will keep you all posted of my upcoming assignments!

Saturday, February 05, 2011

Miss Avery's Painting

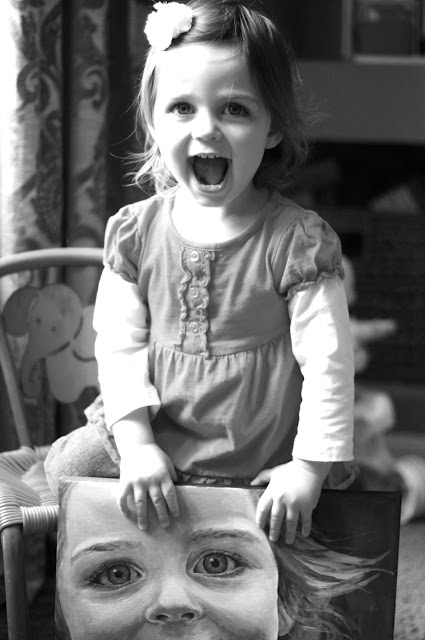
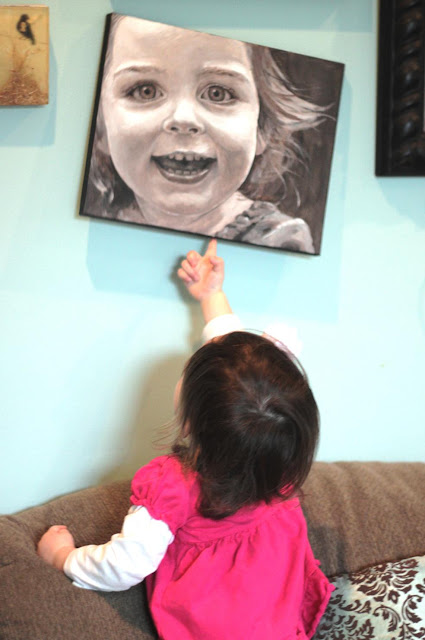
If you've been reading my blog for a while, you may remember a few years ago (wow, has it been that long?) when I did painted portraits of my boys.  Poor Avery hasn't been well represented on the walls until recently, so I finally have gotten around to remedying that!

Here is our newest piece on the wall, done from the photo below:

 Just look at that face- what a sweetie!!

 It's been a while since I did a realistic painting, but I'm very pleased with the results!


It came out a little different in tone than the boys', but I don't mind.


As you can see, she is equally enamored with herself, but I guess that's what to expect from a little girl!!


Now, my next task is to do a little silhouette of her to complete the arrangement!

Friday, February 04, 2011

Get Your Paint On

I'm taking an online painting class taught by Mati McDonough and Lisa Congdon, both artists whom I've admired for a while.  Our first assignment was to do a piece inspired by the Gee's Bend quilts. Oh my, are there some gorgeous pieces there!!

This particular one especially caught my eye.  I LOVE the mixture of the dainty feminine patterns with the bolder geometric patterns- SWOON!  The above painting was my piece inspired by the quilt.  Looking at the two side by side, I definitely prefer the quilt, but I'm fairly happy with the painting as well...!

I'm looking forward to the remainder of the class- I love both teachers' work so much, I'm hoping to glean some of their carefree, whimsical style to incorporate into my own work!

Friday, January 21, 2011

Journal Pages Roundup

I finished Riley's latest journal, and did the cover.  As you can see, it covers an entire year of his life.  As he gets older, I just don't seem to get to his book as often as I'd like, but I guess that just goes with the territory of having three kids!

 Noah's book got a spread about his wonderful relationship with his baby sister- they really seem to have a special bond!

He also got a page about SUPER NOAH!  Boy, this kid is into superheroes lately!  So he really loves this page!  I had a lot of fun making it, trying to get that comic book vibe, yet still stay within my own style...
 Miss Avery learned to walk a few months ago, so this page is about that milestone.  I love the vintage baby shoes embellishments I found (probably by Joleen's) at Michael's.  I don't often use premade scrapbook embellishments, but every so often, I find the perfect one!
 Here's a spread about the dress worn by both Avery and myself as a baby.  The photos themselves were posted on my Flickr site, so if you'd like a closer look, you can see them there.

And one about her learning to talk.  I really love this page!  I love the vintage girl illustration with her pigtails! I've been putting Avery's hair in pigtails lately, and the drawing really reminds me of her...

Okay, hope you're all having a great start to the weekend.  We've got a teacher's workday here today, so are spending the day home playing.  The kids haven't even taken off their pajamas, which is not like me at all!  But we're all loving it!

Sunday, January 16, 2011

My New Favorite Find

There she was, for just $5, propped among the other abandoned artwork at the thrift store...

And now here she resides, on Avery's wall.  Little blue-eyed, brown-haired sweetie, holding a tiny kitten- just who I wanted to be when I was young, and just who I envision Avery to be in a few short years...

Sunday, January 09, 2011

Our New Mantle Artwork

Well, I hope everyone had a great holiday season!  Ours was really nice-lots of family time and relaxation time, which was really appreciated by us all.  Not to mention some really nice gifts (can you say Anthropologie gift certificates???).  Obviously, the gift certificates were for me, but let me introduce you to one of my gifts to my husband. 


A new piece of artwork for over our mantle featuring silhouettes of the three kids!

Previously, this is what hung in the space.  I did this piece a couple years ago to represent our family of four.  Well, obviously, we are no longer a family of four, and I've been wanting to update it for a while. 

I took this photo a few months ago on a hotel balcony.  I love how each child is represented, and how each pose really shows their personalities.  Riley is the head of the pack, standing up, showing the others what to do, Noah is trying to keep up with Riley, and Avery is right in there with them, not afraid at all.

So I made a stencil of their images, and created a piece of artwork around it.  On each child, I wrote a single word describing them.  Riley: eager, Noah: sensitive, Avery: sweet.

I had a great time just "playing" with the paint around the focal images, using colors and shapes that just felt "right" to me.   I really need to do more larger pieces, because it's just so much more fun to paint this way!

I have to say that I think I love the piece more than my husband does, but that's okay- it really was a gift to myself anyway (wink, wink!).  He just gets the pleasure of enjoying it, too!

Tuesday, December 14, 2010

"Vintage" Christmas Stockings

A couple years ago, Pam Garrison posted photos of a Christmas stocking she had made for her son.  Ever since then, I've had it in my mind to make similar stockings for our family.  I've been collecting vintage holiday felt bits and bobs, and decided to tackle the project this year!  Here are the results!


Each one is comprised of some vintage bits from old stockings or old appliques and some new cutouts that I did.  I have to admit that I took the easy way out and glued most things down instead of sewing, so I'm crossing my fingers they'll hold up!  If not, I can always go back and stitch them down at a later point.

I hope it's not too big-headed to say that I absolutely LOVE the way these turned out!!!  The colors and the vintage handmade look were exactly what I was going for!  If you're interested to see a few more shots, as well as some closer looks at the individual stockings, they're on my Flickr page....

We also have some cross-stitched stockings that my mother-in-law made, so I'm going to have to go shopping for more stuff to fill TWO stockings for each kid now- ha ha!

Hope everyone's holiday season is going well!

Thursday, December 09, 2010

The New Playroom

Hello, welcome to our new playroom!  For Riley's fifth birthday he got bunk beds, which meant that both boys now share a room, leaving Riley's old room free.  Many elements you may remember, as I was able to keep the same paint, curtains, some furniture, etc. 

Let me take you on a tour (there are also more photos on my Flickr site, due to my uploading problems on the blog, so check them out as well)!


This is a little shelf that houses two vintage pieces of needlework.  I found them both while in the process of putting together the room, and they're really perfect for the playroom!

I'll start from the left wall, as you enter, then travel around clockwise...  That red bookshelf is one of only two pieces I had to buy to do the room (from Ikea).  Everything else I already had, in various other rooms.  Above the bookshelf is a wonderful vintage coloring book entitled "Playroom" that I purchased from Elizabeth Holcombe- perfect!!  Close-up photos of it are on the Flickr site... 

Artwork (pages from vintage cloth books) and curtains were all part of Riley's old decor...

The majority of the storage is all along one wall.  The bottom units are also from Ikea (called Trofast), and I already had two, so just had to purchase one extra.  There's just enough room between them to hold a little Lego table we had.  And the top white units I already had as well (purchased at A.C. Moore).  We put up two shelves between them (again, we already had them) for extra storage.

And by the way, yes, we should purchase stock in Fisher Price Imaginext toys!!!

A couple days after I took the original photos, I made this little banner to hang over the storage wall, which is why you don't see it in the other shots.  I simply took a couple of vintage cloth books apart, and sewed the pages into a strip of red seam binding.

And that's it!  I think this is the easiest room re-do I've done, and everything just worked out beautifully!  Everything fit and matched and turned out great, which was a great relief.  And the kids are adjusting really well to the change.  We used to have toys scattered throughout the house, and it's so nice to have a place for them all in here.  And there's room to grow, so once Avery starts accumulating lots of toys, she'll have space for them in here as well.

I hope you've enjoyed the tour.  Again, take a look at Flickr for some more detailed shots and a few other views as well!

Friday, December 03, 2010

The Play Kitchen(s)

Well, so I've definitely figured out my photo problem on Blogger.  If I shoot my photos horizontally, then things work fine, but if I shoot them vertically, they're close to impossible to edit in here.  The problem is that I usually take most photos vertically!  But, in instances where I know I'll be blogging, I'll make a point to shoot horizontally, such as in this case. 

So, one thing I'm always on the lookout for while thrifting is a vintage play kitchen.  For a while we had a modern plastic kitchen with the boys, but it just didn't hold their interest.  I decided that when Avery was old enough, she should have a nice wooden kitchen, preferably vintage.  Well, I never seemed to run across a vintage one, and I've seen such an assortment of cute homemade kitchens out in blogland, that I was willing to give it a go.

Allow me to introduce you to The OLD Play Kitchen, purchased for $5 (at 75% off) from a thrift store:

Cute enough, but in need of some repairs, and a little too pastelly/cutesy for my tastes.  But I couldn't pass up the price for a wooden kitchen.  Plus, I like that it is fairly small, and  has both oven space as well as refrigerator space.  And I could see that it definitely had Potential with a capital P!

So, now allow me to introduce you to The NEW Play Kitchen:


Ta-Dah!

 I even thrifted some storage containers to organize things on the inside!


As you can see, the changes were pretty easy for such a dramatic makeover.  New paint, new hardware, a pretty little curtain, a pretty little decal, and a new oven door (courtesy of my husband).


The "oven knobs" were in the clearance bin at Anthropologie for $3 each, and were pretty much exactly what I had in mind! Red and vintage-looking!


 I am absolutely thrilled with the results!  If you head over to my Flickr page, there are a few photos of the kids playing with the kitchen (they were shot vertically, so won't work here!).  I had intended to save it as a gift for Avery for Christmas, but there really wasn't any place to store it for a month, so what the heck!


And so, you thought my story was done there, didn't you?  So did I, frankly. We have an adorable little kitchen that both my husband and I put lots of love and work into, and the kids seem to love it.  That's just what I wanted, right?  But, oh, wait, what's that behind my little blue kitchen in the above photo???


Ummmm, yeah.... another play kitchen....


As luck would have it, not two weeks after finishing the little blue kitchen, what should I come across at Goodwill but this wood kitchen for $7?!?  If I had dreamed up a vintage wooden play kitchen, it couldn't have looked more perfect than this!  Absolutely exactly what I would have wanted!   There's no way I couldn't buy it, is there?  You guys are with me on this one, aren't you?  (If you are, let me know, because at this point, my husband really thinks I'm crazy!)


What a dilemma! 


Very luckily for me, my parents just bought a house in town, and my mother offered to keep one of the kitchens at her house.  Whew!  Because, honestly, I really don't think I could have parted with one!  Now, I just need to decide which one goes where, which is no easy task either, but at least I can change my mind if I decide I miss one! 

Well, I hope you enjoyed my long-winded adventure there!  I still need to post photos of some of my other projects- our new playroom and shared bedroom for the boys.  Both turned out great, and I'm excited to show them off!

Hope you're all having a great season so far!